

How To Create Windows Service In Asp Net
This browser is no longer supported.
Upgrade to Microsoft Edge to take advantage of the latest features, security updates, and technical support.
- Feedback
- Edit
Create a Windows Service using BackgroundService
- Article
- 8 minutes to read
Thank you.
.NET Framework developers are probably familiar with Windows Service apps. Before .NET Core and .NET 5+, developers who relied on .NET Framework could create Windows Services to perform background tasks or execute long-running processes. This functionality is still available and you can create Worker Services that run as a Windows Service.
In this tutorial, you'll learn how to:
- Publish a .NET worker app as a single file executable.
- Create a Windows Service.
- Create the
BackgroundServiceapp as a Windows Service. - Start and stop the Windows Service.
- View event logs.
- Delete the Windows Service.
Prerequisites
- The .NET 5.0 SDK or later
- A Windows OS
- A .NET integrated development environment (IDE)
- Feel free to use Visual Studio
Create a new project
To create a new Worker Service project with Visual Studio, you'd select File > New > Project.... From the Create a new project dialog search for "Worker Service", and select Worker Service template. If you'd rather use the .NET CLI, open your favorite terminal in a working directory. Run the dotnet new command, and replace the <Project.Name> with your desired project name.
dotnet new worker --name <Project.Name> For more information on the .NET CLI new worker service project command, see dotnet new worker.
Install NuGet package
In order to interop with native Windows Services from .NET IHostedService implementations, you'll need to install the Microsoft.Extensions.Hosting.WindowsServices NuGet package.
To install this from Visual Studio, use the Manage NuGet Packages... dialog. Search for "Microsoft.Extensions.Hosting.WindowsServices", and install it. If you'd rather use the .NET CLI, run the dotnet add package command:
dotnet add package Microsoft.Extensions.Hosting.WindowsServices As part of the example source code for this tutorial, you'll need to also install the Microsoft.Extensions.Http NuGet package.
dotnet add package Microsoft.Extensions.Http For more information on the .NET CLI add package command, see dotnet add package.
After successfully adding the packages, your project file should now contain the following package references:
<ItemGroup> <PackageReference Include="Microsoft.Extensions.Hosting" Version="6.0.0" /> <PackageReference Include="Microsoft.Extensions.Hosting.WindowsServices" Version="6.0.0" /> <PackageReference Include="Microsoft.Extensions.Http" Version="6.0.0" /> </ItemGroup> Update project file
This worker project makes use of C#'s nullable reference types. To enable them for the entire project, update the project file accordingly:
<Project Sdk="Microsoft.NET.Sdk.Worker"> <PropertyGroup> <TargetFramework>net6.0</TargetFramework> <Nullable>enable</Nullable> <ImplicitUsings>true</ImplicitUsings> <RootNamespace>App.WindowsService</RootNamespace> </PropertyGroup> <ItemGroup> <PackageReference Include="Microsoft.Extensions.Hosting" Version="6.0.0" /> <PackageReference Include="Microsoft.Extensions.Hosting.WindowsServices" Version="6.0.0" /> <PackageReference Include="Microsoft.Extensions.Http" Version="6.0.0" /> </ItemGroup> </Project> The preceding project file changes add the <Nullable>enable<Nullable> node. For more information, see Setting the nullable context.
Create the service
Add a new class to the project named JokeService.cs, and replace its contents with the following C# code:
using System.Net.Http.Json; using System.Text.Json; namespace App.WindowsService; public class JokeService { private readonly HttpClient _httpClient; private readonly JsonSerializerOptions _options = new() { PropertyNameCaseInsensitive = true }; private const string JokeApiUrl = "https://karljoke.herokuapp.com/jokes/programming/random"; public JokeService(HttpClient httpClient) => _httpClient = httpClient; public async Task<string> GetJokeAsync() { try { // The API returns an array with a single entry. Joke[]? jokes = await _httpClient.GetFromJsonAsync<Joke[]>( JokeApiUrl, _options); Joke? joke = jokes?[0]; return joke is not null ? $"{joke.Setup}{Environment.NewLine}{joke.Punchline}" : "No joke here..."; } catch (Exception ex) { return $"That's not funny! {ex}"; } } } public record Joke(int Id, string Type, string Setup, string Punchline); The preceding joke service source code exposes a single functionality, the GetJokeAsync method. This is a Task<TResult> returning method where T is a string, and it represents a random programming joke. The HttpClient is injected into the constructor and assigned to a class-scope _httpClient variable.
Tip
The joke API is from an open source project on GitHub. It is used for demonstration purposes, and we make no guarantee that it will be available in the future. To quickly test the API, open the following URL in a browser:
https://karljoke.herokuapp.com/jokes/programming/random. Rewrite the Worker class
Replace the existing Worker from the template with the following C# code, and rename the file to WindowsBackgroundService.cs:
namespace App.WindowsService; public sealed class WindowsBackgroundService : BackgroundService { private readonly JokeService _jokeService; private readonly ILogger<WindowsBackgroundService> _logger; public WindowsBackgroundService( JokeService jokeService, ILogger<WindowsBackgroundService> logger) => (_jokeService, _logger) = (jokeService, logger); protected override async Task ExecuteAsync(CancellationToken stoppingToken) { while (!stoppingToken.IsCancellationRequested) { string joke = await _jokeService.GetJokeAsync(); _logger.LogWarning(joke); await Task.Delay(TimeSpan.FromMinutes(1), stoppingToken); } } } In the preceding code, the JokeService is injected along with an ILogger. Both are made available to the class as private readonly fields. In the ExecuteAsync method, the joke service requests a joke and writes it to the logger. In this case, the logger is implemented by the Windows Event Log - Microsoft.Extensions.Logging.EventLog.EventLogLogger. Logs are written to, and available for viewing in the Event Viewer.
Note
By default, the Event Log severity is Warning. This can be configured, but for demonstration purposes the WindowsBackgroundService logs with the LogWarning extension method. To specifically target the EventLog level, add an entry in the appsettings.{Environment}.json, or provide an EventLogSettings.Filter value.
"Logging": { "EventLog": { "LogLevel": { "Default": "Information" } } } For more information on configuring log levels, see Logging providers in .NET: Configure Windows EventLog.
Rewrite the Program class
Replace the template Program.cs file contents with the following C# code:
using App.WindowsService; using IHost host = Host.CreateDefaultBuilder(args) .UseWindowsService(options => { options.ServiceName = ".NET Joke Service"; }) .ConfigureServices(services => { services.AddHostedService<WindowsBackgroundService>(); services.AddHttpClient<JokeService>(); }) .Build(); await host.RunAsync(); The UseWindowsService extension method configures the app to work as a Windows Service. The service name is set to ".NET Joke Service". The hosted service is registered, and the HttpClient is registered to the JokeService for dependency injection.
For more information on registering services, see Dependency injection in .NET.
Publish the app
To create the .NET Worker Service app as a Windows Service, it's recommended that you publish the app as a single file executable. It's less error-prone to have a self-contained executable, as there aren't any dependent files lying around the file system. But you may choose a different publishing modality, which is perfectly acceptable, so long as you create an *.exe file that can be targeted by the Windows Service Control Manager.
Important
An alternative publishing approach is to build the *.dll (instead of an *.exe), and when you install the published app using the Windows Service Control Manager you delegate to the .NET CLI and pass the DLL. For more information, see .NET CLI: dotnet command.
sc.exe create ".NET Joke Service" binpath="C:\Path\To\dotnet.exe C:\Path\To\App.WindowsService.dll" <Project Sdk="Microsoft.NET.Sdk.Worker"> <PropertyGroup> <TargetFramework>net6.0</TargetFramework> <Nullable>enable</Nullable> <ImplicitUsings>true</ImplicitUsings> <RootNamespace>App.WindowsService</RootNamespace> <OutputType>exe</OutputType> <PublishSingleFile>true</PublishSingleFile> <RuntimeIdentifier>win-x64</RuntimeIdentifier> <PlatformTarget>x64</PlatformTarget> </PropertyGroup> <ItemGroup> <PackageReference Include="Microsoft.Extensions.Hosting" Version="6.0.0" /> <PackageReference Include="Microsoft.Extensions.Hosting.WindowsServices" Version="6.0.0" /> <PackageReference Include="Microsoft.Extensions.Http" Version="6.0.0" /> </ItemGroup> </Project> The preceding highlighted lines of the project file define the following behaviors:
-
<OutputType>exe</OutputType>: Creates a console application. -
<PublishSingleFile>true</PublishSingleFile>: Enables single-file publishing. -
<RuntimeIdentifier>win-x64</RuntimeIdentifier>: Specifies the RID ofwin-x64. -
<PlatformTarget>x64</PlatformTarget>: Specify the target platform CPU of 64-bit.
To publish the app from Visual Studio, you can create a publish profile that is persisted. The publish profile is XML-based, and has the .pubxml file extension. Visual Studio uses this profile to publish the app implicitly, whereas if you're using the .NET CLI — you must explicitly specify the publish profile for it to be used.
Right-click on the project in the Solution Explorer, and select Publish.... Then, select Add a publish profile to create a profile. From the Publish dialog, select Folder as your Target.

Leave the default Location, and then select Finish. Once the profile is created, select Show all settings, and verify your Profile settings.

Ensure that the following settings are specified:
- Deployment mode: Self-contained
- Produce single file: checked
- Enable ReadyToRun compilation: checked
- Trim unused assemblies (in preview): unchecked
Finally, select Publish. The app is compiled, and the resulting .exe file is published to the /publish output directory.
Alternatively, you could use the .NET CLI to publish the app:
dotnet publish --output "C:\custom\publish\directory" For more information, see dotnet publish.
Create the Windows Service
To create the Windows Service, use the native Windows Service Control Manager's (sc.exe) create command. Run PowerShell as an Administrator.
sc.exe create ".NET Joke Service" binpath="C:\Path\To\App.WindowsService.exe" Tip
If you need to change the content root of the host configuration, you can pass it as a command-line argument when specifying the binpath:
sc.exe create "Svc Name" binpath="C:\Path\To\App.exe --contentRoot C:\Other\Path" You'll see an output message:
[SC] CreateService SUCCESS For more information, see sc.exe create.
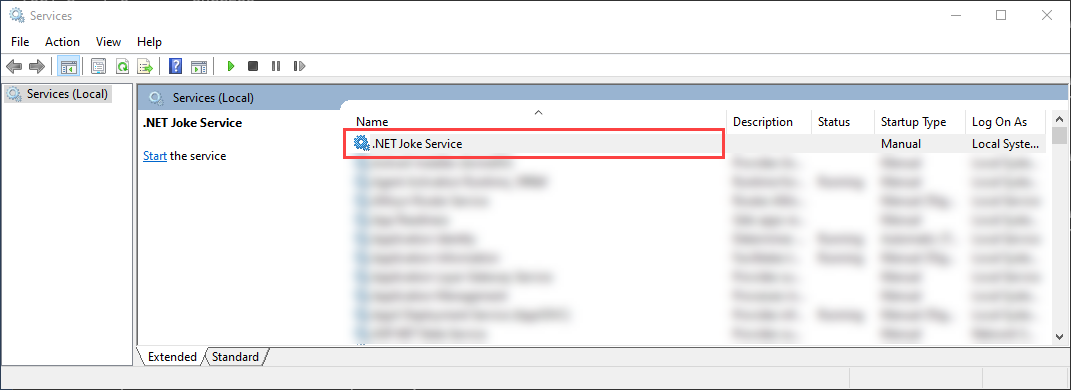
To see the app created as a Windows Service, open Services. Select the Windows key (or Ctrl + Esc), and search from "Services". From the Services app, you should be able to find your service by its name.
Verify service functionality
To verify that the service is functioning as expected, you need to:
- Start the service
- View the logs
- Stop the service
Start the Windows Service
To start the Windows Service, use the sc.exe start command:
sc.exe start ".NET Joke Service" You'll see output similar to the following:
SERVICE_NAME: .NET Joke Service TYPE : 10 WIN32_OWN_PROCESS STATE : 2 START_PENDING (NOT_STOPPABLE, NOT_PAUSABLE, IGNORES_SHUTDOWN) WIN32_EXIT_CODE : 0 (0x0) SERVICE_EXIT_CODE : 0 (0x0) CHECKPOINT : 0x0 WAIT_HINT : 0x7d0 PID : 37636 FLAGS The service Status will transition out of START_PENDING to Running.
View logs
To view logs, open the Event Viewer. Select the Windows key (or Ctrl + Esc), and search for "Event Viewer". Select the Event Viewer (Local) > Windows Logs > Application node. You should see a Warning level entry with a Source matching the apps namespace. Double-click the entry, or right-click and select Event Properties to view the details.

After seeing logs in the Event Log, you should stop the service. It's designed to log a random joke once per minute. This is intentional behavior but is not practical for production services.
Stop the Windows Service
To stop the Windows Service, use the sc.exe stop command:
sc.exe stop ".NET Joke Service" You'll see output similar to the following:
SERVICE_NAME: .NET Joke Service TYPE : 10 WIN32_OWN_PROCESS STATE : 3 STOP_PENDING (STOPPABLE, NOT_PAUSABLE, ACCEPTS_SHUTDOWN) WIN32_EXIT_CODE : 0 (0x0) SERVICE_EXIT_CODE : 0 (0x0) CHECKPOINT : 0x0 WAIT_HINT : 0x0 The service Status will transition out of STOP_PENDING to Stopped.
Delete the Windows Service
To delete the Windows Service, use the native Windows Service Control Manager's (sc.exe) delete command. Run PowerShell as an Administrator.
Important
If the service is not in the Stopped state, it will not be immediately deleted. Ensure that the service is stopped before issuing the delete command.
sc.exe delete ".NET Joke Service" You'll see an output message:
[SC] DeleteService SUCCESS For more information, see sc.exe delete.
See also
- Worker Services in .NET
- Create a Queue Service
- Use scoped services within a
BackgroundService - Implement the
IHostedServiceinterface
Feedback
How To Create Windows Service In Asp Net
Source: https://docs.microsoft.com/en-us/dotnet/core/extensions/windows-service
Posted by: parentdights.blogspot.com
0 Response to "How To Create Windows Service In Asp Net"
Post a Comment